Howto – Raspberry Pi 4 PXE (network) boot

Apropos

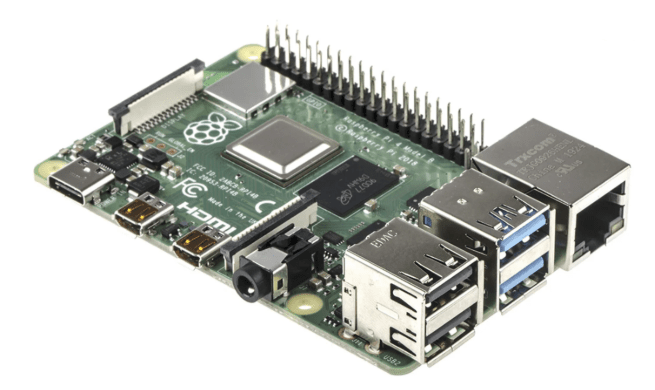
The makers of the Raspberry Pi have recently been announcing boot support for the Raspberry Pi 4. Although there was already boot support for earlier models, the Raspberry Pi 4 has an EEPROM on board in which we can upload PXE capable bootcode, making the use of the SDcard obsolete.

Previously, when an earlier model Raspberry Pi ran it’s boot cycle, the first action programmed to take was to take a look in the first FAT32 (boot) partition on the SD card, looking for bootcode.bin and cmdline.txt. These files are, firmware initialization routines and some kernel parameters. It initializes the hardware and subsequently, boots the linux kernel and specifies which root file system to mount.

Since the Pi 4, the bootcode.bin file is written in the onboard EEPROM of the Pi 4, making reading or writing to the SDcard obsolete. This contributes greatly to the stability and centralized management of the Raspberry Pi.

In this guide, we’ll be taking the following actions to prepare our proof of concept:

  1. install and configure a Freenas NAS virtual machine
  2. prepare the Raspberry Pi filesystem on the NFS share
  3. enable pxe and reconfigure the boot order on the Raspberry Pi
  4. configure the Pfsense DHCP server to support network booting

Step 1: install and configure a Freenas NAS virtual machine

Basic Freenas virtual machine installation:

NOTE: during virtual machine configuration, make sure to add a second disk. The first (OS) disk cannot be used to share files.

Create a storage pool:

In the Freenas Gui, navigate in the left pane to Storage, Pools, and add a new storage pool, selecting the second disk of the virtual machine. I called mine POOL1.

First we will enable the SSH service on the Freenas virtual machine, flip the running switch, click the check mark to start automatically, and configure the actions of the server.

Now that the SSH server is running on the NAS, we’ll be connecting with a putty client using the root username with the password

Next we’ll be creating a directory to contain all our working files for this project:

mkdir /mnt/POOL1/tftp

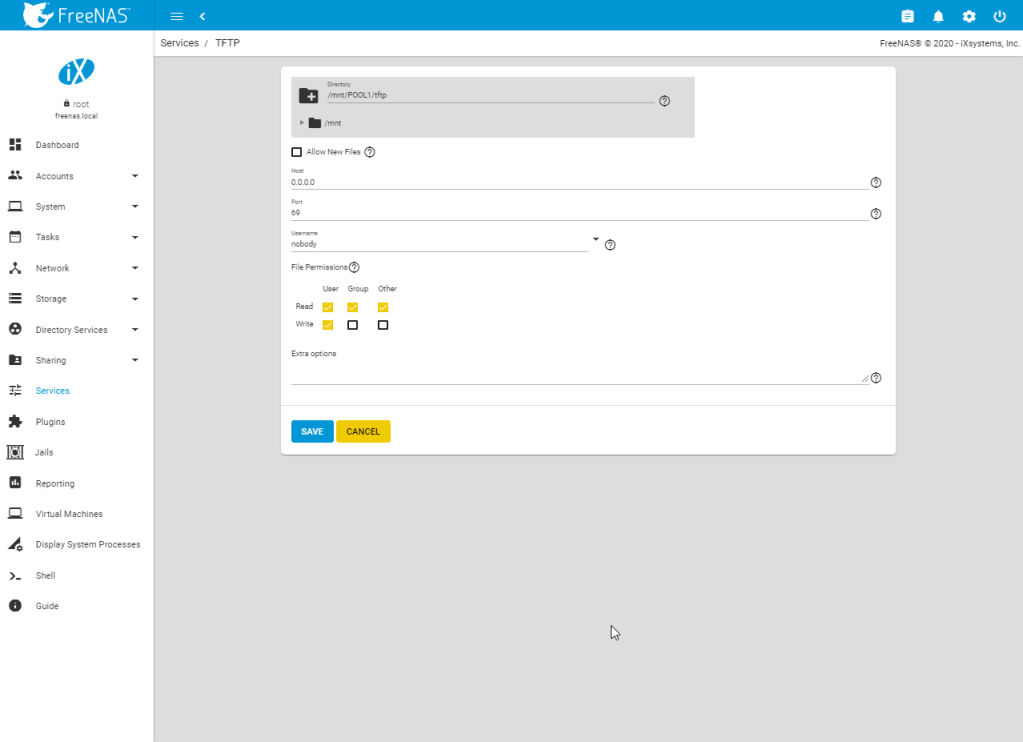
Next we will enable the NFS, SMB, and TFTP server on the freenas and configure their parameters:

Freenas Service Configuration
NFS Server Configuration
SMB Server Configuration
TFTP Server Configuration

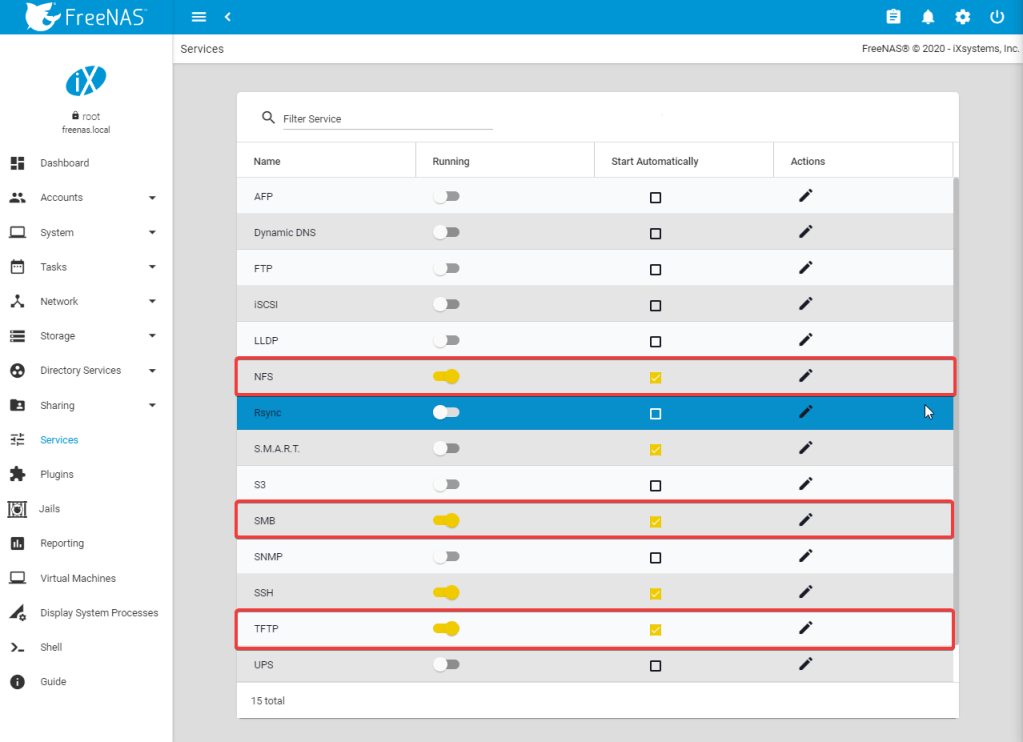
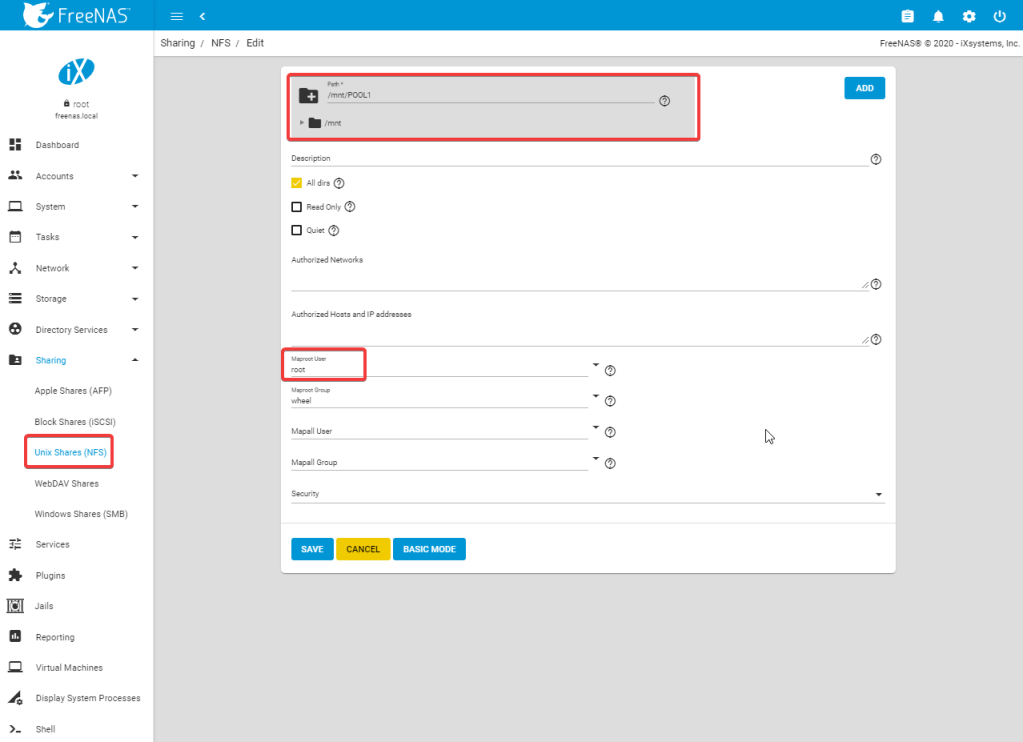
Next we need to configure an NFS share to host the Raspberry Pi’s file systems.

NFS Share Configuration

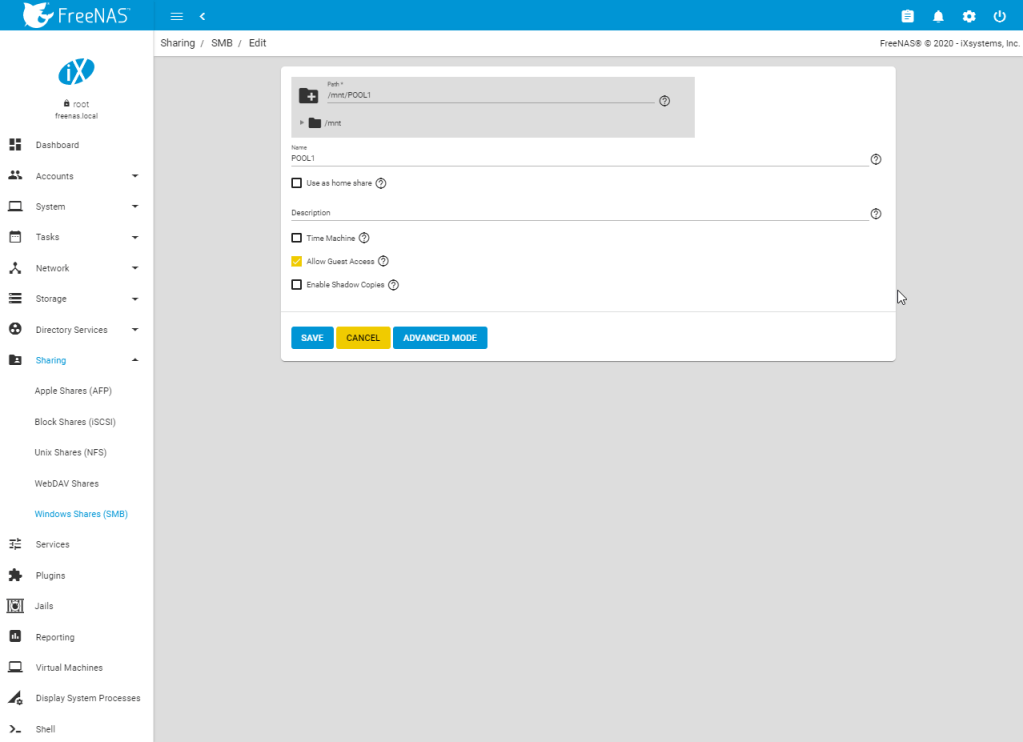
And for simplicity, we will share the directory over SMB so we can take a look with a windows station.

SMB Share Configuration

Step 2: prepare the Raspberry Pi filesystem on the NFS share

To prepare our NFS share with the needed files to boot our Raspberry Pi from, we will SSH into our Freenas box, download and extract the Raspbian OS image, mount the image and copy the boot and root files to a folder in our NFS share.

# download any of the Raspbian OS images at https://www.raspberrypi.org/downloads/raspbian/
wget https://downloads.raspberrypi.org/raspbian_full_latest

# unzip the compressed image
unzip 2020-02-13-raspbian-buster-full.zip

# create a loopback device for our image file
mdconfig -a -t vnode -u 0 -f ./2020-02-13-raspbian-buster.img

# create a folder to mount the boot partition on
mkdir /mnt/img1

# create a folder to mount the root partition on
mkdir /mnt/img2

# mount the fat partition of our image
mount_msdosfs /dev/md0s1 /mnt/img1

# mount the linux partition of our image
mount -t ext2fs -o ro /dev/md0s2 /mnt/img2

# create a directory to contain our files in the tftp server directory, name the directory with the serial number of your Raspberry Pi, it will search for it during boot
mkdir /mnt/POOL1/tftp/my-rpi-serial-number

# also create a rootfs directory to hold the root system files of our Raspberry Pi
mkdir /mnt/POOL1/tftp/my-rpi-serial-number/rootfs

# now copy the boot files into place
rsync -av /mnt/img1/ /mnt/POOL1/tftp/my-rpi-serial-number

# and also the root file system
rsync -av /mnt/img2/ /mnt/POOL1/tftp/my-rpi-serial-number/rootfs

# now that we have our files in place on the NFS server, we can unmount and unplug our image

# first unmount both partitions which we have mounted from our loop device
umount /mnt/img1
umount /mnt/img2

# now free up the loop device
mdconfig -du md0

Pi4 Bootloader Configuration

To facilitate network booting with the Raspberry Pi, we will tell the boot loader on the EEPROM to try network booting if no SDcard is found. We can do this by modifying the boot order in the bootloader configuration.

You can display the currently-active configuration using

vcgencmd bootloader_config

To change these bootloader configuration items, you need to extract the configuration segment, make changes, re-insert it, then reprogram the EEPROM with the new bootloader. The Raspberry Pi will need to be rebooted for changes to take effect.

# Extract the configuration file
cp /lib/firmware/raspberrypi/bootloader/stable/pieeprom-2020-01-17.bin pieeprom.bin
rpi-eeprom-config pieeprom.bin > bootconf.txt

# Edit the configuration using a text editor e.g. nano bootconf.txt

# Change boot order to 0x21, it will make the boot code search for bootcode.bin on SD card first and fallback to network boot
BOOT_ORDER=0x21

# The following option specifies that the Raspberry Pi will search for it's bootfile in a folder with the same name as the mac address of the Piô,
TFTP_PREFIX=2

# Save the new configuration and exit editor

# Apply the configuration change to the EEPROM image file
rpi-eeprom-config --out pieeprom-new.bin --config bootconf.txt pieeprom.bin

To update the bootloader EEPROM with the edited bootloader:

# Flash the bootloader EEPROM
# Run 'rpi-eeprom-update -h' for more information
sudo rpi-eeprom-update -d -f ./pieeprom-new.bin
sudo reboot

Check out the link of the Raspberry Pi website for all options: https://www.raspberrypi.org/documentation/hardware/raspberrypi/bcm2711_bootloader_config.md

Once rebooted, and if no SD card is inserted, the Raspberry Pi will PXE boot. This process goes as follows:

  1. BCM2711 SoC powers up
  2. On board bootrom checks for bootloader recovery file (recovery.bin) on the SD card.
  3. If found, it executes it to flash the EEPROM and recovery.bin triggers a reset.
  4. Otherwise, the bootrom loads the main bootloader from the EEPROM.
  5. Bootloader checks it’s inbuilt BOOT_ORDER configuration item to determine what type of boot to do.
    – SD Card
    – Network
    – USB mass storage
Raspberry Pi 4 Model B - network boot overview

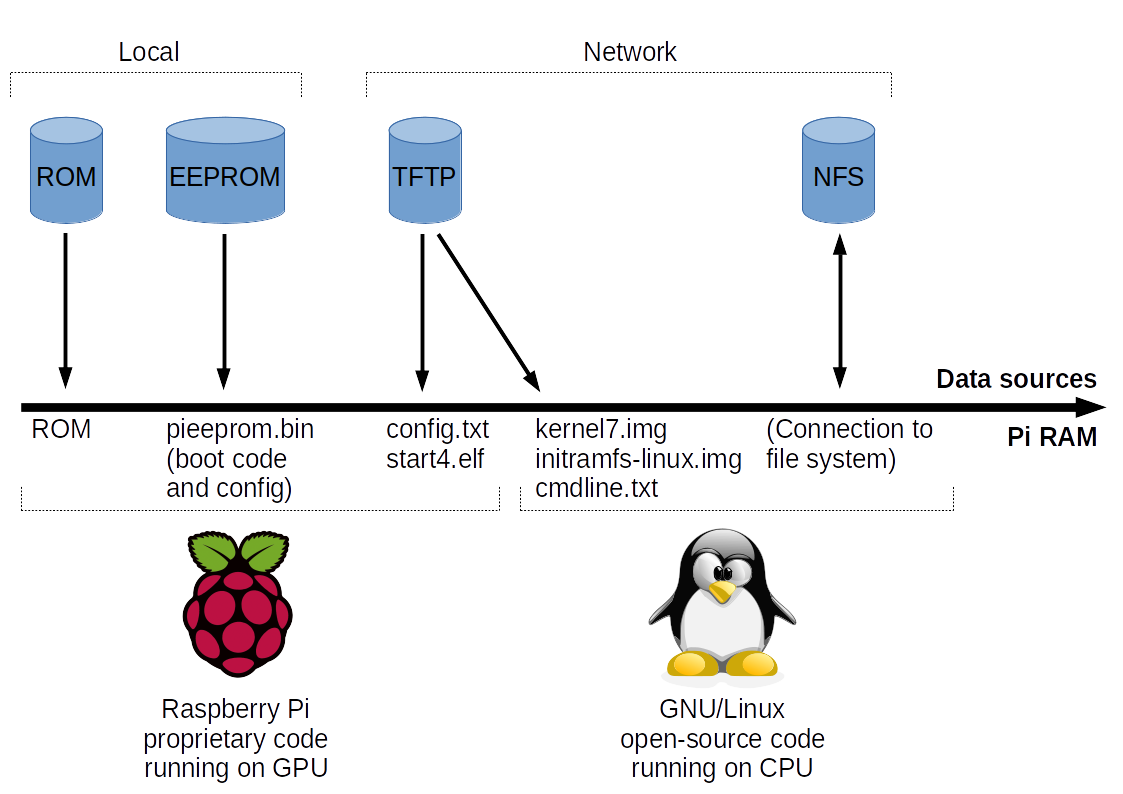
During the kernel boot process, the Raspberry Pi downloads the file cmdlines.txt. This file contains kernel boot parameters and a reference to an NFS server path which should be mounted as root filesystem.

dwcotg.lpm_enable=0 console=serial0,115200 console=tty1 elevator=deadline rootwait rw root=/dev/nfs nfsroot=192.168.20.118:/mnt/POOL1/tftp/7313c84f/rootfs,v3,tcp ip=dhcp

The /etc/fstab file, which is reponsible for mounting volumes during boot time, needs to contain a reference to the boot filesystem on the nfs server. The /boot folder needs to be correctly mounted because the rpi update process tries to access this folder for kernel updates during startup. Below is the contents of my /etc/fstab file:

proc /proc proc defaults 0 0
192.168.20.118:/mnt/POOL1/tftp/7313c84f /boot nfs defaults,proto=udp 0 0

Modifying the swap system

Since dphys-swapfile is not working correctly with nfs mounted shares, we will disable the swap.

# remove the software package which provides the dphys-swapfile service
sudo apt remove -y --purge dphys-swapfile

# remove the old swap file, if any
sudo rm /var/swap

Disabling the resize service

It makes no sense in extending the nfs partition, that’s not possible.

# disable the resize service so it will not give errors during boot
systemctl disable resize2fs_once
reboot

Update your Raspian OS

To finish the installation, make sure to update your Raspbian OS on your nfs mount.

apt update
apt dist-upgrade

Step 4: configure the Pfsense DHCP server to support network booting

Below screenshot outlines the required configuration of the Pfsense DHCP server to allow the Raspberry Pi to boot of the network via DHCP/PXE.

# option 43 is set to the following hexadecimal value
06:01:03:0a:04:00:50:58:45:09:14:00:00:11:52:61:73:70:62:65:72:72:79:20:50:69:20:42:6f:6f:74:ff

Advertisement

Howto – Install Docker Engine – Community (CE) 18.09 on Raspberry Pi

If you ever wanted to experiment with docker app containers on the Raspberry Pi, look no further. This article will guide you to prepare your Raspberry Pi and install docker on top of it.

Downloading your Raspberry Pi Image

For this guide we will be using the official Raspberry Pi – Raspbian Buster Lite image which can be downloaded from the following location: https://www.raspberrypi.org/downloads/raspbian/

So download the zipped image, unzip it, and write it to your SD card with W32diskImager.

(Note: create an empty file called ssh in the root of the boot volume to activate ssh)

Installing pre-requisites and getting to the latest version

First of all, we will be updating our Raspberry Pi to the latest version. To accomplish this, login to your raspberry pi with username pi and password raspberry

Update your apt package cache:

$ sudo apt update

Upgrade your distribution to the latest version:

$ sudo apt dist-upgrade

After performing a dist-upgrade, first reboot your Raspberry Pi before continuing, otherwise you will get in trouble when installing docker.

Install some pre-requisite packages:

$ sudo apt-get install apt-transport-https ca-certificates software-properties-common -y 

Installing docker onto your Pi

This is fairly easy as docker provides an installation script on their website. We just need to get it and let it do it’s work.

$ curl -fsSL get.docker.com -o get-docker.sh && sh get-docker.sh 

Executing docker commands under the Pi account doesn’t work out of the box, therefore we need to add our Pi user to the Docker group.

$ sudo usermod -aG docker pi 

Starting from this point on we are able to run docker containers on the Raspberry Pi

$ docker container run hello-world 

Optional: Enabling secure remote access to the docker daemon:

Before configuring secure remote access to your docker daemon it’s important to understand how OpenSSL, x509, and TLS work.

Create a folder at /etc/systemd/system/docker.service.d 

$ sudo mkdir -p  /etc/systemd/system/docker.service.d 

And create a configuration file /etc/systemd/system/docker.service.d/startup_options.conf with below contents:

# /etc/systemd/system/docker.service.d/override.conf
[Service]
ExecStart=
ExecStart=/usr/bin/dockerd  --tlsverify --tlscacert=ca.pem --tlscert=server-cert.pem --tlskey=server-key.pem -H fd:// -H tcp://0.0.0.0:2376

Read up on the below reference document on how to generate the required certificates:

Reference: https://docs.docker.com/engine/security/https

Reload the systemd daemon:

$ systemctl daemon reload

Restart your docker daemon:

$ systemctl restart docker

You are now able to connect with the docker client to the docker daemon by referencing the created certificates to the docker client.

Howto – Implement E-Mail Antispam Measures

Sender Policy Framework

Sender Policy Framework (SPF) is an email authentication method designed to detect forging sender addresses during the delivery of the email. SPF alone, though, is limited only to detect a forged sender claimed in the envelope of the email which is used when the mail gets bounced. Only in combination with DMARC can it be used to detect the forging of the visible sender in emails (email spoofing), a technique often used in phishing and email spam.

SPF allows the receiving mail server to check during mail delivery that a mail claiming to come from a specific domain is submitted by an IP address authorized by that domain’s administrators. The list of authorized sending hosts and IP addresses for a domain is published in the DNS records for that domain.

If you want to verify if your email domain has SPF correctly implemented, you can use online tools like MX Toolbox to verify this.

https://mxtoolbox.com/spf.aspx

References: 

https://en.wikipedia.org/wiki/Sender_Policy_Framework

https://o365info.com/implementing-spf-fail-policy-using-exchange-online-rule-dealing-spoof-e-mail-attack-introduction-part-1-of-3/

https://o365info.com/implementing-spf-fail-policy-using-exchange-online-rule-dealing-spoof-e-mail-attack-phase-1-learning-mode-part-2-of-3/

https://o365info.com/implementing-spf-fail-policy-using-exchange-online-rule-dealing-with-spoof-e-mail-attack-phase-2-production-part-3-of-3

DomainKeys Identified Mail

DomainKeys Identified Mail (DKIM) is an email authentication method designed to detect forged sender addresses in emails (email spoofing), a technique often used in phishing and email spam.

DKIM allows the receiver to check that an email claimed to have come from a specific domain was indeed authorized by the owner of that domain. It achieves this by affixing a digital signature, linked to a domain name, to each outgoing email message. The recipient system can verify this by looking up the sender’s public key published in the DNS. A valid signature also guarantees that some parts of the email (possibly including attachments) have not been modified since the signature was affixed. Usually, DKIM signatures are not visible to end-users, and are affixed or verified by the infrastructure rather than the message’s authors and recipients.

References: 

https://nl.wikipedia.org/wiki/DomainKeys_Identified_Mail

https://supertekboy.com/2016/06/27/enable-dkim-signing-office-365/

Howto – Set up DKIM Signing on postfix

$ apt-get install openssl
$ openssl genrsa -out myemaildomain.com.private.key.pem 1024 -outform PEM
$ openssl rsa -in  myemaildomain .com.private.key.pem -out  myemaildomain .com.public.key.pem -pubout -outform PEM

# Create a TXT dns record smtprelay._domainkey. myemaildomain .com with the value "k=rsa; p=your public key"

$ apt-get install opendkim opendkim-tools
$ adduser postfix opendkim
$ chown opendkim:opendkim /etc/postfix/ myemaildomain .com.private.key.pem
$ chmod 600 /etc/postfix/ myemaildomain .com.private.key.pem 
$ cat << EOF > /etc/opendkim.conf
# This is a basic configuration that can easily be adapted to suit a standard
# installation. For more advanced options, see opendkim.conf(5) and/or
# /usr/share/doc/opendkim/examples/opendkim.conf.sample.
# Log to syslog
Syslog  yes
# Required to use local socket with MTAs that access the socket as a non-
# privileged user (e.g. Postfix)
UMask   002
# OpenDKIM user
# Remember to add user postfix to group opendkim
UserID  opendkim
# Map domains in From addresses to keys used to sign messages
KeyTable        /etc/opendkim/key.table
SigningTable    refile:/etc/opendkim/signing.table
# Hosts to ignore when verifying signatures
ExternalIgnoreList      /etc/opendkim/trusted.hosts
InternalHosts   /etc/opendkim/trusted.hosts
# Commonly-used options; the commented-out versions show the defaults.
Canonicalization        relaxed/simple
Mode    s
SubDomains      no
#ADSPAction     continue
AutoRestart     yes
AutoRestartRate 10/1M
Background      yes
DNSTimeout      5
SignatureAlgorithm      rsa-sha256
# Always oversign From (sign using actual From and a null From to prevent
# malicious signatures header fields (From and/or others) between the signer
# and the verifier.  From is oversigned by default in the Debian package
# because it is often the identity key used by reputation systems and thus
# somewhat security sensitive.
OversignHeaders From
EOF 
$ chmod u=rw,go=r /etc/opendkim.conf
$ mkdir /etc/opendkim
$ mkdir /etc/opendkim/keys
$ chown -R opendkim:opendkim /etc/opendkim
$ chmod go-rw /etc/opendkim/keys 
$ cat << EOF > /etc/opendkim/signing.table
*@myemaildomain.com   smtprelay
EOF 
$ cat << EOF > /etc/opendkim/key.table
smtprelay     myemaildomain.com:smtprelay:/etc/postfix/myemaildomain.com.private.key.pem
EOF 
$ cat << EOF > /etc/opendkim/trusted.hosts
127.0.0.1
::1
localhost
smtprelay
smtprelay.myemaildomain.com
myemaildomain.com
10.0.0.0/8
78.235.22.41/32
EOF 
$ chown -R opendkim:opendkim /etc/opendkim
$ chmod -R go-rw /etc/opendkim/keys
$ systemctl restart opendkim
$ systemctl status -l opendkim
$ opendkim-testkey -d myemaildomain.com -s smtprelay
$ mkdir /var/spool/postfix/opendkim
$ chown opendkim:postfix /var/spool/postfix/opendkim
$ sed -i 's/SOCKET="local:\/var\/run\/opendkim\/opendkim.sock"/SOCKET="local:\/var\/spool\/postfix\/opendkim\/opendkim.sock"/g' /etc/default/opendkim 
$ cat << EOF >> /etc/postfix/main.cf
# Milter configuration
# OpenDKIM
milter_default_action = accept
# Postfix ≥ 2.6 milter_protocol = 6, Postfix ≤ 2.5 milter_protocol = 2
milter_protocol = 6
smtpd_milters = local:/opendkim/opendkim.sock
non_smtpd_milters = local:/opendkim/opendkim.sock
EOF 
$ systemctl restart opendkim
$ systemctl restart postfix 

References: 

https://www.linode.com/docs/email/postfix/configure-spf-and-dkim-in-postfix-on-debian-8/

DMARC (Domain-based Message Authentication, Reporting and Conformance)

DMARC (Domain-based Message Authentication, Reporting and Conformance) is an email authentication protocol. It is designed to give email domain owners the ability to protect their domain from unauthorized use, commonly known as email spoofing. The purpose and primary outcome of implementing DMARC is to protect a domain from being used in business email compromise attacks, phishing emails, email scams and other cyber threat activities.

Once the DMARC DNS entry is published, any receiving email server can authenticate the incoming email based on the instructions published by the domain owner within the DNS entry. If the email passes the authentication it will be delivered and can be trusted. If the email fails the check, depending on the instructions held within the DMARC record the email could be delivered, quarantined or rejected.

DMARC extends two existing mechanisms, Sender Policy Framework (SPF) and DomainKeys Identified Mail (DKIM). It allows the administrative owner of a domain to publish a policy in their DNS records to specify which mechanism (DKIM, SPF or both) is employed when sending email from that domain; how to check the From: field presented to end users; how the receiver should deal with failures – and a reporting mechanism for actions performed under those policies.

References: 

https://en.wikipedia.org/wiki/DMARC

KB – Troubleshooting Windows Server Update Services

Command line switches for wuauclt

The following are the command line for wuauclt.

OptionDescription
/a /ResetAuthorizationInitiates an asynchronous background search for applicable updates. If Automatic Updates is disabled, this option has no effect.
/r /ReportNowSends all queued reporting events to the server asynchronously.
/? /h /helpShows this help information.

Method 1: Reset Windows update components.

Resetting Windows Update Components will fix corrupt Windows Update Components and help you to install the Windows Updates. Please follow the below steps to reset the Windows Updates Components manually:

  1. Press Windows Key + X on the keyboard and then select “Command Prompt (Admin)” from the menu.
  2. Stop the BITSCryptographicMSI Installer and the Windows Update Services. To do this, type the following commands at a command prompt. Press the “ENTER” key after you type each command.
    • net stop wuauserv
    • net stop cryptSvc
    • net stop bits
    • net stop msiserver
  3. Now rename the SoftwareDistribution and Catroot2 folder. You can do this by typing the following commands in the Command Prompt. Press the “ENTER” key after you type each command.
    • ren C:\Windows\SoftwareDistribution SoftwareDistribution.old
    • ren C:\Windows\System32\catroot2 Catroot2.old
  4. Now, let’s restart the BITS, CryptographicMSI Installer and the Windows Update Services. Type the following commands in the Command Prompt for this. Press the ENTER key after you type each command.
    • net start wuauserv
    • net start cryptSvc
    • net start bits
    • net start msiserver

5. Type Exit in the Command Prompt to close it.

Now you may try running the Windows Updates and check if the above steps resolve the issue.

Solving the Windows Update 80072EE2 Error
To fix this I simply performed the follow steps:

Windows Update Error 80072EE2 RegeditGo to Start
In the Run box type regedit and hit enter
In the registry editor, browse to the folder in the left hand panel to the HKEY_LOCAL_MACHINE\SOFTWARE\Policies\Microsoft\Windows\WindowsUpdate folder and delete the keys in the right hand pane called WUServer and WIStatusServer
In the Run box type services.exe and hit enter
Find the ‘Windows Update‘ service at the bottom of the list
Right click it and select Restart

rem @echo off
set /p id=Input computername: 
echo Stopping wuauserv on %id%
sc \\%id% stop wuauserv

echo Stopping cryptSvc on %id%
sc \\%id% stop cryptSvc

echo Stopping bits on %id%
sc \\%id% stop bits

echo Stopping msiserver on %id%
sc \\%id% stop msiserver

net use w: \\%id%\c$
ren w:\Windows\SoftwareDistribution SoftwareDistribution.old.$((( RANDOM % 10 )+1))
ren w:\Windows\System32\catroot2 Catroot2.old
net use w: /d
pause

echo Starting wuauserv on %id%
sc \\%id% start wuauserv

echo Starting cryptSvc on %id%
sc \\%id% start cryptSvc

echo Starting bits on %id%
sc \\%id% start bits

echo Starting msiserver on %id%
sc \\%id% start msiserver

Howto – Install and Configure Strongswan for connection with a Fortigate unit

vi /etc/network/interfaces
iface eth0:0 inet static
address 192.168.0.1
netmask 255.255.255.0
ifup eth0:0

sysctl -w net.ipv4.ip_forward=1
/sbin/iptables -t nat -A POSTROUTING -o eth0 -j MASQUERADE
/sbin/iptables -A FORWARD -i eth0 -o eth0:0 -m state –state RELATED,ESTABLISHED -j ACCEPT
/sbin/iptables -A FORWARD -i eth0:0 -o eth0 -j ACCEPT
iptables-save

apt install -y strongswan
 

# clearing iptables
sudo iptables -t nat -F
sudo iptables -t mangle -F
sudo iptables -F
sudo iptables -X

# This file is automatically generated. Do not edit
config setup
        uniqueids = yes

conn bypasslan
        leftsubnet = 192.168.20.0/24
        rightsubnet = 192.168.20.0/24
        authby = never
        type = passthrough
        auto = route

conn con1000
        fragmentation = yes
        keyexchange = ikev2
        reauth = yes
        forceencaps = no
        mobike = no

        rekey = yes
        installpolicy = yes
        type = tunnel
        dpdaction = restart
        dpddelay = 10s
        dpdtimeout = 60s
        auto = route
        left = 82.33.252.36
        right = 216.33.201.18
        leftid = 82.33.252.36
        ikelifetime = 28800s
        lifetime = 43200s
        ike = aes256-sha512-ecp512bp!
        esp = aes256-sha512-ecp512bp!
        leftauth = psk
        rightauth = psk
        rightid = 216.33.201.18
        rightsubnet = 10.0.0.0/8
        leftsubnet = 192.168.20.0/24

Gitlab Runner and Docker in Docker dind configuration

About Docker + TLS 

Docker client-server communication 

For Docker-in-Docker (docker:*dind) services, we need to share the “client certificates directory” (with all docker containers). 

Since 19.03, the docker-in-docker containers enable TLS by default. 

The container startup generates all the required certificates (CA, server and client). 

The docker (client) container probes for client certificates and enables TLS accordingly. 

How is TLS probed on the client? 

  1. When the “${DOCKER_TLS_CERTDIR}/client” contains the files ca.pem, cert.pem and client.key, the ‘docker:latest’ container will enable TLS by default. If the files are not available TLS will be disabled. 
  2. You can also force the use of TLS by defining DOCKER_TLS_VERIFY=1 

In either case, the DOCKER_HOST will be defined accordingly. When TLS is enabled, it will be set to tcp://docker:2376. When TLS is disabled, it will be set to tcp://docker:2375. 

Where is the data stored? 

The folder where the daemon stores the certificates (CA, client, server) can be defined (overridden) by the DOCKER_CERT_PATH environment variable. The client certificates will be stored to ${DOCKER_TLS_DIR}/client. 

The folder where the client reads the (client) certificates are read can be defined (overridden) by the DOCKER_CERT_PATH environment variable. It defaults to ${DOCKER_TLS_DIR}/client. 

Please note that if ${DOCKER_CERT_PATH} is not equal to ${DOCKER_TLS_DIR}/client, you may need to force TLS by yourself

Which means that you need to define the environment variables: 

  • DOCKER_HOST = tcp://docker:2376 
    (default to tcp://docker:2375 otherwise) 
  • DOCKER_TLS_VERIFY = 1 

Docker server-registry communication 

NoteThis section may also be relevant for client-server and or client-registry communication 

Docker (daemon) looks under /etc/docker/certs.d/<hostname>:<port> for docker registry certificates. 

See also https://docs.docker.com/engine/security/certificates/#understand-the-configuration

So we must map our company CA certificate for the GitLab registry (mygitserver.mydomain.com:4567) to that path. 

GitLab Runner Installation 

Prepare container configuration 

Configuration directory for gitlab-runner 

$ sudo mkdir -m 0700 -p /srv/docker-runner/config  

(optional) Install Company CA certificate 

Note: This is only required when mygitserver.mydomain .com uses a server certificate signed by a self-signed company CA. 

  1. For gitlab-runner 
$ sudo mkdir -m 0700 /srv/docker-runner/config/certs 
 
$ sudo cp /usr/share/ca-certificates/mydomain.com/mycaserver.mydomain.com.crt /srv/docker-runner/config/certs/ 
 
$ sudo chmod 0600 /srv/docker-runner/config/certs/ mycaserver.mydomain.com.crt   
  1. For docker-in-docker 
    See explanation under (optional) with Mycompany CA certificate 
$ sudo mkdir -m 0700 -p /srv/docker/certs.d/gitlab.mydomain.com\:4567  

$ sudo cp /usr/share/ca-certificates/mydomain.com/mycaserver.mydomain.com.crt /srv/docker/certs.d/mygitserver.mydomain.com\:4567/  

$ sudo chmod 0600 /srv/docker/certs.d/ mygitserver.mydomain.com \:4567/ mycaserver.mydomain.com.crt   

Register the runner 

Basic command 

Command we use for registering docker runner (as Group Runner): 

We define a ‘docker’ runner: 

  • Needs to run in privileged mode 
  • TLS verification is enabled 
  • Default docker image (if not overridden in .gitlab-ci.yml) is debian:stretch-slim 
  • Use better performing storage driver (overlay2; instead of vfs) 
    (see also Why use overlay2 as Docker storage driver?
  • Share the “/cache” volume (TODO: why ?
  • Share the “client certificates directory” (“/certs/client”) directory (see also About Docker + TLS why we do so) 
$ docker run --rm -t -i \  
-v /srv/docker-runner/config:/etc/gitlab-runner \  
gitlab/gitlab-runner register \  
--non-interactive \  
--url 'https://mygitserver.mydomain.com/' \  
--registration-token '******' \  
--description 'docker-runner' \  
--locked='true' \  
--tag-list 'docker' \  
--executor 'docker' \  
--env 'DOCKER_DRIVER=overlay2' \  
--docker-privileged \  
--docker-tlsverify \  
--docker-image 'debian:stretch-slim' \  
--docker-volumes '/cache' \  
--docker-volumes '/certs/client'  

(optional) with Company CA certificate 

Note: This is only required when mygitserver.mydomain.com uses a server certificate signed by a self-signed company CA. 

Direct volume mapping /srv/gitlab-runner/config/certs to /etc/docker/certs.d/ mygitserver.mydomain .com:4567 does not work (because of the “:” in “/etc/docker/certs.d/ mygitserver.mydomain .com:4567″). 

So we map the parent directory: certs.d

$ docker run --rm -t -i -v /srv/docker-runner/config:/etc/gitlab-runner \  
gitlab/gitlab-runner register \  
--non-interactive \  
--url 'https://mygitserver.mydomain.com/' \  
--tls-ca-file '/etc/docker-runner/certs/intermediate.mydomain.com.crt' \  
--registration-token '******' \  
--description 'docker-runner' \  
--locked='true' \  
--tag-list 'docker' \ 
--executor 'docker' \  
--env 'DOCKER_DRIVER=overlay2' \  
--docker-privileged \  
--docker-tlsverify \  
--docker-image 'debian:stretch-slim' \  
--docker-volumes '/cache' \  
--docker-volumes '/srv/docker/certs.d:/etc/docker/certs.d:ro' \  
--docker-volumes '/certs/client'  

Example run 

$ sudo -u myuser docker run --rm -t -i \  
 -v /srv/docker-runner/config:/etc/gitlab-runner \  
 gitlab/gitlab-runner register \  
 --non-interactive \  
 --url 'https://mygitserver.mydomain.com/' \  
 --registration-token '*****' \  
 --description 'docker-runner' \  
 --locked='true' \  
 --tag-list 'docker' \  
 --executor 'docker' \  
 --env 'DOCKER_DRIVER=overlay2' \  
 --docker-privileged \  
 --docker-tlsverify \  
 --docker-image 'debian:stretch-slim' \  
 --docker-volumes '/cache' \  
 --docker-volumes '/certs/client'  

The output:

Runtime platform                                    arch=amd64 os=linux pid=7 revision=d0b76032 version=12.0.2  

Running in system-mode. 

Registering runner... succeeded                     runner=******   

Runner registered successfully. Feel free to start it, but if it's running already the config should be automatically reloaded!  

Review the configuration to support Company CA in Docker-in-Docker: 

Eventually, update the concurrency to the allowed number of parallel jobs 

$ sudo cat /srv/docker-runner/config/config.toml  
 concurrent = 4  
 check_interval = 0 

 [session_server]  
 session_timeout = 1800 
 
 [[runners]]  
 name = "docker-runner"  
 url = "https://mygitserver.mydomain.com/"  
 token = "********"  
 executor = "docker"  
 environment = ["DOCKER_DRIVER=overlay2"]  

 [runners.custom_build_dir]  

 [runners.docker]  
 tls_verify = true  
 image = "debian:stretch-slim"  
 privileged = true  
 disable_entrypoint_overwrite = false  
 oom_kill_disable = false  
 disable_cache = false  
 volumes = ["/cache", "/certs/client"]  
 shm_size = 0  

 [runners.cache]  
 
 [runners.cache.s3]  

 [runners.cache.gcs]  
 
 [runners.custom]  
 run_exec = ""  

Create the container :

$ sudo docker run \  
 --detach \  
 --name docker-runner \  
 --restart always \  
 -v /srv/docker-runner/config:/etc/gitlab-runner \  
 -v /var/run/docker.sock:/var/run/docker.sock \  
 gitlab/gitlab-runner:latest  

Output:

c6c600202cd86098e0e01fb2433d4f51ed570444ac89234382bb089e01e7ef11  

Use the container: 

Why use overlay2 as Docker storage driver? 

See https://mygitserver.mydomain.com/help/ci/docker/using_docker_build.md#using-the-overlayfs-driver 

Examples: 

For example: build build server image(s): 

https://mygitserver.mydomain.com/testproject/blob/master/.gitlab-ci.yml

This file is a template, and might need editing before it works on your project.
 Official docker image.
 image: docker:stable 
 XXX - Hmm, does not work using default services? (mygitserver.mydomain.com:4567/testproject)
 #
 Only required when the gitlab-runner does not provide the services itself in its config.toml file:
 [[runners]]
 [runners.docker]
 services = [ "docker:stable-dind" ]
 #
 services:
 name: docker:stable-dind
 # No longer required
 # command:
 #   - /bin/sh
 #   - -c
 #   - wget http://mycaserver.mydomain.com/mycacertificate.crt
 #         -O /usr/local/share/ca-certificates/mycacertificate.mydomain.com.pem
 #     && update-ca-certificates
 #     && dockerd-entrypoint.sh
 #     || exit 
 #
 See also
 https://mygitserver.mydomain.com/help/ci/docker/using_docker_build.md#container-registry-examples
 for a nicely structure test/release/deploy script.
 #
 variables:
   # Force using TCP port 2376 (instead of default 2375)
   # see also
   # - https://github.com/docker-library/docs/tree/master/docker#tls
   # - https://gitlab.com/gitlab-org/gitlab-runner/blob/master/.gitlab-ci.yml
   # XXX - done by default in docker:stable (19.03)
 DOCKER_HOST: tcp://docker:2376
 # DOCKER_TLS: 1
 DOCKER_TLS_VERIFY: 1
 # DOCKER_CERT_PATH: ~/.docker
 #   DOCKER_TLS_CERTDIR: "/certs"
 DOCKER_CERT_PATH: "/certs/client"
 #
   # See also
   # - https://gitlab.com/gitlab-org/gitlab-runner/issues/4501
   # - https://gitlab.com/gitlab-org/gitlab-runner/issues/4512
   # - https://gitlab.com/gitlab-org/gitlab-ce/merge_requests/31051/diffs
   # - https://mygitserver.mydomain.com/help/ci/docker/using_docker_build.md#use-docker-in-docker-executor
   #
   # When using dind service we need to instruct docker, to talk with
   # the daemon started inside of the service. The daemon is
   # available with a network connection instead of the default
   # /var/run/docker.sock socket. docker:19.03-dind does this
   # automatically by setting the DOCKER_HOST in
   # https://github.com/docker-library/docker/blob/d45051476babc297257df490d22cbd806f1b11e4/19.03/docker-entrypoint.sh#L23-L29
   #
   # The 'docker' hostname is the alias of the service container as described at
   # https://docs.gitlab.com/ee/ci/docker/using_docker_images.html#accessing-the-services.
   #
   # When using dind, it's wise to use the overlayfs driver for
   # improved performance.
 Now fine by using volume_driver = "overlay2" in "config.toml"?
 DOCKER_DRIVER: overlay2
 # Specify to Docker where to create the certificates, Docker will
   # create them automatically on boot, and will create
   # /certs/client that will be shared between the service and
   # build container.
   #
   # XXX - Seems to defined by default in gitlab-runner (12.*) ?
 DOCKER_TLS_CERTDIR: "/certs"
 #
   CONTAINER_BASE_TEST_IMAGE: $CI_REGISTRY_IMAGE/base:$CI_COMMIT_REF_SLUG
   CONTAINER_BASE_RELEASE_IMAGE: $CI_REGISTRY_IMAGE/base:latest
   CONTAINER_DEFAULT_TEST_IMAGE: $CI_REGISTRY_IMAGE/default:$CI_COMMIT_REF_SLUG
   CONTAINER_DEFAULT_RELEASE_IMAGE: $CI_REGISTRY_IMAGE/default:latest
   # Default to UID/GID 1001/1001 since the user myuser@myserver has those IDs
   # If we define them otherwise we get issues when using sbuild.
   # E.g.
   #     sbuild --version
   # returns
   #     Can't get passwd entry for uid 1001:  at /usr/share/perl5/Sbuild/ConfBase.pm line 92.
   SBUILD_USER_ID: 1001
   SBUILD_GROUP_ID: 1001
   CONTAINER_SBUILD_TEST_IMAGE: $CI_REGISTRY_IMAGE/sbuild:$CI_COMMIT_REF_SLUG
   CONTAINER_SBUILD_RELEASE_IMAGE: $CI_REGISTRY_IMAGE/sbuild:latest
 before_script:
 printenv
 ls -lhARw0 --color /etc/docker* || true
 ls -lhARw0 --color "${DOCKER_CERT_PATH:-${HOME}/.docker}" || true 
 - docker --log-level=debug --debug=true version
 - docker --log-level=debug --debug=true info
 docker --log-level=debug --debug=true login -u "$CI_REGISTRY_USER" -p "$CI_REGISTRY_PASSWORD" $CI_REGISTRY 
 stages:
 build-base
 build 
 build-master:info:
   stage: build-base
   tags:
     - docker
   script:
     - id
     - docker version
     - docker info
   only:
     - master
 build-master:base:
   stage: build-base
   tags:
     - docker
   script:
     - docker build --pull
         --tag="$CONTAINER_BASE_RELEASE_IMAGE"
         --file Dockerfile.buildserver-debian-base .
     - docker push "$CONTAINER_BASE_RELEASE_IMAGE"
   only:
     - master
 build-master:default:
   stage: build
   tags:
     - docker
   # Fine because of ordering in 'stages' definition:
   # dependencies:
   #   - build-master:base
   script:
     - docker build --pull
         --tag="$CONTAINER_DEFAULT_RELEASE_IMAGE"
         --file Dockerfile.buildserver-debian-9 .
     - docker push "$CONTAINER_DEFAULT_RELEASE_IMAGE"
   only:
     - master
 build-master:sbuild:
   stage: build
   tags:
     - docker
   # Fine because of ordering in 'stages' definition:
   # dependencies:
   #   - build-master:base
   script:
     - docker build --pull
         --tag="$CONTAINER_SBUILD_RELEASE_IMAGE"
         --build-arg user_id="${SBUILD_USER_ID}"
         --build-arg group_id="${SBUILD_GROUP_ID}"
         --file Dockerfile.buildserver-debian-9-sbuild .
     - docker push "$CONTAINER_SBUILD_RELEASE_IMAGE"
   only:
     - master
 build:base:
   stage: build-base
   tags:
     - docker
   script:
     - docker build --pull
         --tag="$CONTAINER_BASE_TEST_IMAGE"
         --file Dockerfile.buildserver-debian-base .
     - docker push "$CONTAINER_BASE_TEST_IMAGE"
   except:
     - master
 build:default:
   stage: build
   tags:
     - docker
   # Fine because of ordering in 'stages' definition:
   # dependencies:
   #   - build:base
   script:
     - docker build --pull
         --tag="$CONTAINER_DEFAULT_TEST_IMAGE"
         --file Dockerfile.buildserver-debian-9 .
     - docker push "$CONTAINER_DEFAULT_TEST_IMAGE"
   except:
     - master
 build:sbuild:
   stage: build
   tags:
     - docker
   # Fine because of ordering in 'stages' definition:
   # dependencies:
   #   - build:base
   script:
     - docker build --pull
         --tag="$CONTAINER_SBUILD_TEST_IMAGE"
         --build-arg user_id="${SBUILD_USER_ID}"
         --build-arg group_id="${SBUILD_GROUP_ID}"
         --file Dockerfile.buildserver-debian-9-sbuild .
     - docker push "$CONTAINER_SBUILD_TEST_IMAGE"
   except:
     - master

See also https://gitlab.com/gitlab-org/gitlab-runner/blob/master/.gitlab-ci.yml 

Building Docker containers for the GitLab Docker Registry 

https://mygitserver.mydomain.com/help/ci/docker/using_docker_build.md#container-registry-examples

References 

Howto – Install a self signed web server certificate

If your company has it’s own Microsoft enterprise certificate authority.

All services on the network which might require an x.509 certificate can utilize the company’s internal certificate authority to sign any certificate signing requests for their purpose.

Below we will draft out an example on how to proceed to secure a web server which is running apache on linux.

First of all, if we will be rolling out company signed certificates onto a linux host, the linux host must have a root authority certificate available as to be able to verify the chain of trust.

For the preparation of certificate usage on linux, and to install our company’s authority root certificate onto a linux host we have created a separate manual: https://blog.ronnyvdb.net/2019/09/02/howto-install-self-signed-ca-root-certificate-on-linux/

Before continuing with the creation of a server certificate, make sure that you have first installed the root certificate.

Securing a web site with a server certificate is a three stage process and consist of the following steps:

  • Generating a private key for the server
  • Creating a certificate signing request derived from this key
  • Signing the certificate signing request with the company’s certificate authority
  • Retrieving the signed certificate and installing this on apache

Generating a private key for the server:

1. Create a folder to hold the private key and certificate

$ mkdir -p /etc/ssl/localcerts 

2. Generate a private rsa key with a length of 2048 bits

$ openssl genrsa -out ./mywebserver.mycompany.com.key 2048 

change the permissions of the key so it’s only readable by the owner root:

$ chmod 0600 ./mywebserver.mycompany.com.key 

Create a certificate signing request from this key, and answer the identity details of the certificate

$ openssl req -new -sha256 -key ./ mywebserver.mycompany.com.key -out ./ mywebserver.mycompany.com.csr 
  • Country Name (2 letter code) [AU]:BE
  • State or Province Name (full name) [Some-State]:My State
  • Locality Name (eg, city) []:My Locality
  • Organization Name (eg, company) [Internet Widgits Pty Ltd]:My Company
  • Organizational Unit Name (eg, section) []:IT
  • Common Name (e.g. server FQDN or YOUR name) []:myserver.mycompany.com
  • Email Address []:contact@mycompany.com
  • no challenge password
  • no optional company name

openssl req -new -sha256 -key ./myserver.mycompany.com.key -out ./ myserver.mycompany.com .csr

Signing the certificate signing request with the company’s certificate authority

The private certificate authority of your Microsoft certificate instance can be accessed in the following way:

When surfing to this web page, you will need to authenticate with your domain crecentials:

  • mydomain\username and your password

Once authenticated, you will be able to request a certificate, and submit your certificate signing request.   So click ‘Request a certificate’

Select advanced certificate request.

On the Certificate Request page, we will be able to submit our certificate signing request that we had generated earlier.

Copy and paste the contents of this certificate signing request into the box, select to use the web server certificate template and fill in the following attributes to add a subject alternative name to the certificate:

san:dns=myserver.mydomain.com 

Note that this subject alternative name can contain multiple dns names in the following form:

san:dns=my.domain1.com&dns=my.domain2.com&dns=my.domain3.com

All separate domains would be added as subject alternative names.

In the end, click submit.

The certificate request will be signed automatically on the certificate authority without user intervention, depending on how the certificate authority was configured.

Afterwards you will be able to download the certificate, this must be done in Base 64 Encoding to be able to install it easily on linux.

Select Base 64 encoded and click Download certificate.

It will download a readable text file with the signed contents of your certificate signing request, and will be easily copy and pasted into an ssh session.

Create a new file on linux to contain the Base 64 encoded certificate data.

Paste the certificate data in your new file.

$ vi myserver.mydomain.com.crt 

Now that we have our signed certificate available on our linux box, we can configure our apache installation to use the certificate to encrypt our web traffic.

Edit your apache site configuration and change the top of your config file to redirect your site to https automatically:

 <VirtualHost *:80>
        ServerName myserver.mydomain.com
        Redirect / https://myserver.mydomain.com/
</VirtualHost> 

 <VirtualHost *:443>
        SSLEngine On
        SSLCertificateFile /etc/ssl/localcerts/myserver.mydomain.com.crt
        SSLCertificateKeyFile /etc/ssl/localcerts/myserver.mydomain.com.key 
 </VirtualHost> 

Save your configuration, enable the apache ssl module, and off you go.

$ a2enmod ssl 
$ systemctl reload apache2 

Howto – Install Gitlab on Debian in a Docker Container

Abstract:

In this procedure we will be installing Gitlab in a Docker Container on a freshly installed Debian Server.  Installing the OS is beyond the scope of this installation procedure, which focuses primarily on setting up docker and getting a container up and running with Gitlab.

Install Gitlab Container on Docker

Reference: https://docs.gitlab.com/omnibus/docker/

The Gitlab docker image is hosted on docker hub and can therefore be pulled with docker. 

Pulling and running the image can be done with below snippet, which pulls and runs the docker image, maps a few folders from the docker host into the Gitlab container, and exposes the web, secure shell, and registry ports.

  • We instruct docker to download and run the container from the docker hub.
  • We configure the the hostname of the gitlab instance.
  • We map the ssh port to the outside world so we can ssh to the container.
  • We map 3 paths to the local filesystem.
  • The container is stateless, configuration files, data and logs are written outside of the container on the local machines filesystem.
$ sudo docker run --detach \
--hostname gitlab.mycompany.com \
--env GITLAB_OMNIBUS_CONFIG="external_url 'https://gitlab.mycompany.com/'" \
--publish 443:443 --publish 80:80 --publish 2222:22 --publish 4567:4567 \
--name gitlab \
--restart always \
--volume /srv/gitlab/config:/etc/gitlab \
--volume /srv/gitlab/logs:/var/log/gitlab \
--volume /srv/gitlab/data:/var/opt/gitlab \
gitlab/gitlab-ce:latest 

A few useful things to know:

Check the status of the running containers on your docker instance:

$  docker container ls 

If you want to take a look into the container, you can spawn a shell session in the container with below command:

$  sudo docker exec -it gitlab /bin/bash 

Gitlab can be either configured with the parameters when deploying the container, or with the main configuration file ‘/srv/gitlab/config/gitlab.rb’ on the local filesystem (which is mapped to /etc/gitlab inside the container).  

NOTE: each time that you make a change to the configuration file, you will need to issue a gitlab reconfiguration command:

$  sudo docker exec -it gitlab gitlab-ctl reconfigure 

Editing the configuration via the local filesystem:

$  vi /srv/gitlab/config/gitlab.rb 

configuration inside the container:

$  sudo docker exec -it gitlab vi /etc/gitlab/gitlab.rb 

Restart the gitlab docker container:

$  sudo docker restart gitlab 

How to upgrade gitlab to a newer version:

To upgrade the running gitlab docker container, we need to stop and remove it, then pull the latest version.

$ sudo docker stop gitlab
$ sudo docker rm gitlab
$ sudo docker pull gitlab/gitlab-ce:latest 

After pulling the latest version, re-launch your gitlab container as u did the first time:

 $ sudo docker run --detach \
--hostname gitlab.mycompany.com \
--env GITLAB_OMNIBUS_CONFIG="external_url 'https://gitlab.mycompany.com/'" \
--publish 443:443 --publish 80:80 --publish 2222:22 --publish 4567:4567 \
--name gitlab \
--restart always \
--volume /srv/gitlab/config:/etc/gitlab \
--volume /srv/gitlab/logs:/var/log/gitlab \
--volume /srv/gitlab/data:/var/opt/gitlab \
gitlab/gitlab-ce:latest 

Configure the web gui of gitlab to use SSL

Generate a private key and a certificate signing request with openssl:

$ mkdir -p /srv/gitlab/config/ssl
openssl genrsa -out /srv/gitlab/config/gitlab.mycompany.com.key 2048

$ openssl req -new -sha256 -key /srv/gitlab/config/gitlab.mycompany.com.key -out /srv/gitlab/config/gitlab.mycompany.com.csr 

Now sign this certificate signing request with our internal root certificate authority, and copy the resulting base64 encoded key back to gitlab:

$ vi /srv/gitlab/config/ssl/gitlab.mycompany.com.crt 

Configuring gitlab for ldap authentication:

First copy our root certification authority certificate to the trusted_certificates folder of gitlab ‘/srv/gitlab/config/trusted-certs/myca001.crt ‘.  (this is necessary to validate the server certificate of our ldap server for tls encryption)

Open the gitlab configuration file:

$ vi /srv/gitlab/config/gitlab.rb 

Find the LDAP section and add below configuration snippet for our Active Directory

gitlab_rails['ldap_enabled'] = true
gitlab_rails['ldap_servers'] = YAML.load <<-EOS # remember to close this block with 'EOS' below
main: # 'main' is the GitLab 'provider ID' of this LDAP server
  ## label
  #
  # A human-friendly name for your LDAP server. It is OK to change the label later,
  # for instance if you find out it is too large to fit on the web page.
  #
  # Example: 'Paris' or 'Acme, Ltd.'
  label: 'mycompany AD'
  host: 'mydc01.mycompany.com'
  port: 636
  uid: 'sAMAccountName'
  encryption: 'simple_tls' # "start_tls" or "simple_tls" or "plain"
  bind_dn: 'CN=ADBind,OU=SystemAccounts,OU=Operations,DC=mycompany,DC=com'
  password: 'mypassword'
  # This setting specifies if LDAP server is Active Directory LDAP server.
  # For non AD servers it skips the AD specific queries.
  # If your LDAP server is not AD, set this to false.
  active_directory: true
  # If allow_username_or_email_login is enabled, GitLab will ignore everything
  # after the first '@' in the LDAP username submitted by the user on login.
  #
  # Example:
  # - the user enters 'jane.doe@example.com' and 'p@ssw0rd' as LDAP credentials;
  # - GitLab queries the LDAP server with 'jane.doe' and 'p@ssw0rd'.
  #
  # If you are using "uid: 'userPrincipalName'" on ActiveDirectory you need to
  # disable this setting, because the userPrincipalName contains an '@'.
  allow_username_or_email_login: false
  # If lowercase_usernames is enabled, GitLab will lower case the username.
  lowercase_usernames: false
  # Base where we can search for users and groups
  #
  #   Ex. ou=People,dc=gitlab,dc=example
  #
  base: 'DC=mycompany,DC=com'
  group_base: 'OU=Groups,OU=1. Data Center Assets,OU=mycompany.com,DC=mycompany,DC=com'
  admin_group: 'web_mygitlab001.mycompany.com_admin'
  # Filter LDAP users
  #
  #   Format: RFC 4515 http://tools.ietf.org/search/rfc4515
  #   Ex. (employeeType=developer)
  #
  #   Note: GitLab does not support omniauth-ldap's custom filter syntax.
  #
  user_filter: ''
EOS 

Or the short version 🙂

gitlab_rails['ldap_enabled'] = true gitlab_rails['ldap_servers'] = { 'main' => {   'label' => 'mycompany AD',   'host' =>  'mydc01.mycompany.com',   'port' => 636,   'uid' => 'sAMAccountName',   'encryption' => 'simple_tls',   'verify_certificates' => true,   'bind_dn' => 'CN=ADBind,OU=SystemAccounts,OU=Operations,DC=mycompany,DC=com',   'password' => 'Lymmundectoriathoracc8',   'active_directory' => true,   'base' => 'DC=mycompany,DC=com',   'group_base' => 'OU=Groups,OU=1. Data Center Assets,OU=mycompany.com,DC=mycompany,DC=com',   'admin_group' => 'web_mygitlab001.mycompany.com_admin'   } } 

Now connect to the docker container and reconfigure gitlab for the changes to take effect:

$ docker exec -it gitlab /bin/bash
$ gitlab-ctl reconfigure 

If you surft to the gitlab web page, a new tab for ldap authentication should now be visible.

Enabling Container Registry on Gitlab

Reference: https://docs.gitlab.com/ee/administration/container_registry.html#container-registry-domain-configuration

Edit the gitlab configuration file:

$ vi /srv/gitlab/config/gitlab.rb 

configure the registry_external_url

registry_external_url 'https://gitlab.mycompany.com:4567' 

Reconfigure gitlab:

$ docker exec -it gitlab /bin/bash 
$ gitlab-ctl reconfigure 

Howto clone your git repository over SSH

There are two possibilities for this, the first one uses a ssh url syntax, on which you can specify the correct port of the gitlab server, the second example involves creating a .ssh/config file with an entry for gitlab server ssh parameters.

In the first example (url syntax):

Create a folder for your repository:

$ mkdir -p /home/netadm/myproject 

Then clone your repository in this folder

$ cd /home/netadm/myproject
$ git clone ssh://git@gitlab.mycompany.com:2222/IT/Pastebin.git 

In the second example (ssh config alias):

$ vi ~/.ssh/config 

Paste below config snippet:

 Host gitlab
        HostName gitlab.mycompany.com
        Port 2222
        User git
        IdentityFile ~/.ssh/id_rsa
        PreferredAuthentications publickey 

Then you can use the config alias to clone your repository with the correct ssh settings:

$ git clone gitlab:IT/Pastebin.git 

Windows Assesment and Deployment kit Downloads

List of Windows 10 ADK Versions and Downloads

For the assesment and automated deployment, Microsoft has released several versions of their Assesment and Deployment Kit.

Below table lists the different versions and their respective download links.

WINDOWS 10 ADK VERSION HISTORY

Windows ADK for Windows 10 v180910.1.17763September, 2018Download link
Windows ADK for Windows 10 v180310.1.17134April, 2018Download link
Windows ADK for Windows 10 v170910.1.16299October, 2017Download link
Windows ADK for Windows 10 v170310.1.15063March. 2017Download Link
Windows ADK for Windows 10 v160710.1.14393.0Sept. 2016Download Link
Windows ADK for Windows 10 v151110.1.10586.0Oct. 2015Download Link
Windows ADK for Windows 10 RTM10.0.26624.0July. 2015Download Link
Windows ADK for Windows 1010.0.10240.0July. 2015Download Link
ADK for Windows 8 Download Link
AIK for Windows 7 Download Link