If we want to modify partitions and file systems in our disk image file, we will need to mount the image as a so-called loop device in linux.
Not only will we need to mount the image as a loop device, but we also need to make sure that our loop device will auto create additional device entries for the partitions detected on our image.
On Ubuntu, this function is baked into the linux kernel, and this functionality can be enabled in the following way:
edit /etc/default/grub
Add the following:
max_loop=64
As last parameter on the following line:
GRUB_CMDLINE_LINUX_DEFAULT=""
Now execute to activate: , reboot and verify with
update-grub2
Now reboot your station and verify if the loop devices are available with:
ls /dev/loop*
for ubuntu 16.04 LTS
sudo losetup -Pf disk_image.raw
You can list the partition table of an image file with the following command:
fdisk -l my-raw-imagefile.img

We gather from the partition table that we have two available partitions in the image file.
Before we can make any modification to the partitions or filesystems in our image, we will first need to mount the image as a loop device, which will install the required dev entries to address our partitions with other software as gparted.
To mount the image as a loop device:
sudo losetup --find --show my-raw-imagefile.img
This will mount /dev/loop0 as a ‘virtual raw disk’ and it’s containing partitions accordingly as /dev/loop0p1 and /dev/loop0p2
Now that we have set-up our raw imagefile as a loop device, we can run filesystem tools on it. We can use for example gparted to resize the file systems contained in the partitions of our image:
gparted /dev/loop0

Do any resize operation that you would like to have for your partitions and apply them, in my case I needed to trim down my image size as small as possible.
Now that the resize operations have been done in our raw disk image, we will dump the partitions to a smaller image.
First remove our loop device for the image, as it will interfere with the dump process:
sudo losetup -d /dev/loop0
Now list our partition table so we have an idea what to dump:
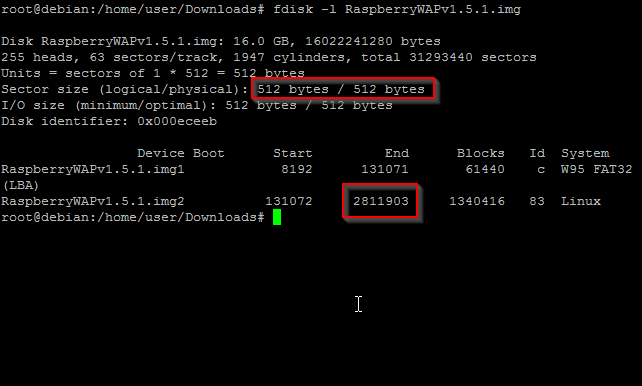
In our partition table we can see that our blocks are 512 bytes long, and we have a total number of 2811903 blocks to dump … doing the actual dump is done with dd which just reads raw blocks of data and dumps them somwhere.
dd bs=512 count=2811904 if=my-original-raw-imagefile.img of=my-resized-raw-imagefile.img
bs = the blocksize to read
count = the amount of blocks to dump
if = input file to read from
of = output file to write to

Very good guide but (at least with the current ubuntu version) you missed an import command. After the losetup command and before the gparted command, the command partprobe /dev/loop0 is needed otherwise it claims unavailability of any partition in subsequent steps.
LikeLike
Thanks a lot 🙂 it seems to work!
LikeLike