
If your company has it’s own Microsoft enterprise certificate authority.
All services on the network which might require an x.509 certificate can utilize the company’s internal certificate authority to sign any certificate signing requests for their purpose.
Below we will draft out an example on how to proceed to secure a web server which is running apache on linux.
First of all, if we will be rolling out company signed certificates onto a linux host, the linux host must have a root authority certificate available as to be able to verify the chain of trust.
For the preparation of certificate usage on linux, and to install our company’s authority root certificate onto a linux host we have created a separate manual: https://blog.ronnyvdb.net/2019/09/02/howto-install-self-signed-ca-root-certificate-on-linux/
Before continuing with the creation of a server certificate, make sure that you have first installed the root certificate.
Securing a web site with a server certificate is a three stage process and consist of the following steps:
- Generating a private key for the server
- Creating a certificate signing request derived from this key
- Signing the certificate signing request with the company’s certificate authority
- Retrieving the signed certificate and installing this on apache
Generating a private key for the server:
1. Create a folder to hold the private key and certificate
$ mkdir -p /etc/ssl/localcerts
2. Generate a private rsa key with a length of 2048 bits
$ openssl genrsa -out ./mywebserver.mycompany.com.key 2048
change the permissions of the key so it’s only readable by the owner root:
$ chmod 0600 ./mywebserver.mycompany.com.key
Create a certificate signing request from this key, and answer the identity details of the certificate
$ openssl req -new -sha256 -key ./ mywebserver.mycompany.com.key -out ./ mywebserver.mycompany.com.csr
- Country Name (2 letter code) [AU]:BE
- State or Province Name (full name) [Some-State]:My State
- Locality Name (eg, city) []:My Locality
- Organization Name (eg, company) [Internet Widgits Pty Ltd]:My Company
- Organizational Unit Name (eg, section) []:IT
- Common Name (e.g. server FQDN or YOUR name) []:myserver.mycompany.com
- Email Address []:contact@mycompany.com
- no challenge password
- no optional company name
openssl req -new -sha256 -key ./myserver.mycompany.com.key -out ./ myserver.mycompany.com .csr
Signing the certificate signing request with the company’s certificate authority
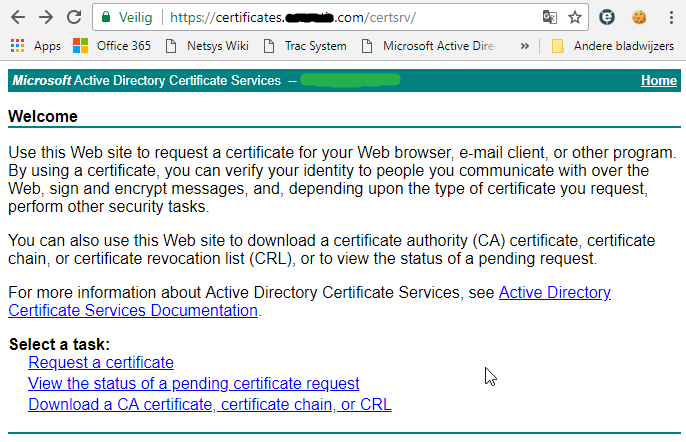
The private certificate authority of your Microsoft certificate instance can be accessed in the following way:
When surfing to this web page, you will need to authenticate with your domain crecentials:
- mydomain\username and your password
Once authenticated, you will be able to request a certificate, and submit your certificate signing request. So click ‘Request a certificate’
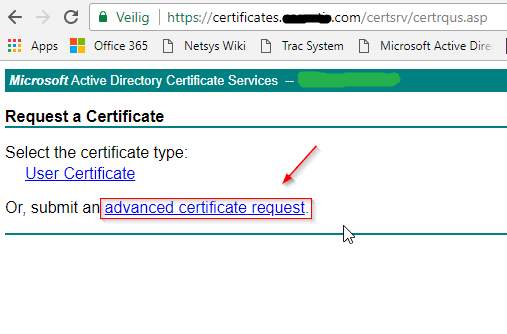
Select advanced certificate request.
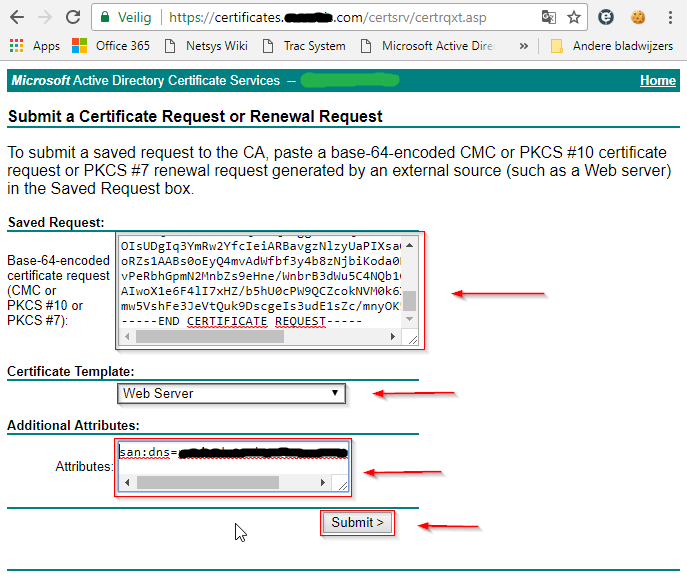
On the Certificate Request page, we will be able to submit our certificate signing request that we had generated earlier.
Copy and paste the contents of this certificate signing request into the box, select to use the web server certificate template and fill in the following attributes to add a subject alternative name to the certificate:
san:dns=myserver.mydomain.com
Note that this subject alternative name can contain multiple dns names in the following form:
san:dns=my.domain1.com&dns=my.domain2.com&dns=my.domain3.com
All separate domains would be added as subject alternative names.
In the end, click submit.
The certificate request will be signed automatically on the certificate authority without user intervention, depending on how the certificate authority was configured.
Afterwards you will be able to download the certificate, this must be done in Base 64 Encoding to be able to install it easily on linux.
Select Base 64 encoded and click Download certificate.
It will download a readable text file with the signed contents of your certificate signing request, and will be easily copy and pasted into an ssh session.

Create a new file on linux to contain the Base 64 encoded certificate data.
Paste the certificate data in your new file.
$ vi myserver.mydomain.com.crt
Now that we have our signed certificate available on our linux box, we can configure our apache installation to use the certificate to encrypt our web traffic.
Edit your apache site configuration and change the top of your config file to redirect your site to https automatically:
 <VirtualHost *:80>
        ServerName myserver.mydomain.com
        Redirect / https://myserver.mydomain.com/
</VirtualHost>

 <VirtualHost *:443>
        SSLEngine On
        SSLCertificateFile /etc/ssl/localcerts/myserver.mydomain.com.crt
        SSLCertificateKeyFile /etc/ssl/localcerts/myserver.mydomain.com.key
 </VirtualHost>
Save your configuration, enable the apache ssl module, and off you go.
$ a2enmod ssl
$ systemctl reload apache2
