A place to contribute learned knowledge about Information and Communication Technology.
Author: Ronny Van den Broeck
I'm a network and system engineer for more than 20 years now.
During this period I became a pro in hunting down one's and zero's, with an eager mindset to help people accomplish the same or abstract them away from the matrix.
Verify that you now have the key with the fingerprint9DC8 5822 9FC7 DD38 854A E2D8 8D81 803C 0EBF CD88, by searching for the last 8 characters of the fingerprint.
Use the following command to set up the stable repository. You always need the stable repository, even if you want to install builds from the edge or test repositories as well. To add the edge or test repository, add the word edge or test (or both) after the word stable in the commands below.
Install a specific version by its fully qualified package name, which is the package name (docker-ce) plus the version string (2nd column) up to the first hyphen, separated by a an equals sign (=), for example, docker-ce=18.03.0.ce.
$ sudo apt-get install docker-ce=<VERSION_STRING>
The Docker daemon starts automatically.
Verify that Docker CE is installed correctly by running the hello-world image.
If you are running your own x509 certificate authority with a self signed root certificate, and want to use this to sign your own server certificates for usage on Linux servers, then this article is for you.
This article will explain to you how to install the root certificate of your self signed certificate authority on your Linux server.
Prerequisites
(not required for java / Active Directory Plugin)
If not yet installed, install wget or curl you will use these tools to download the root certificate.
Install the ca-certificates package, this downloads the root certificates of all public certificate authorities, so these will be trusted. It also creates a certificate store on your Linux server to which we can add our own, self signed, root certificate.
$ sudo apt-get install ca-certificates
If you need the CA certificate in Java too, you will probably want to install the hook scripts for updating the trusted CA certificates for the JRE store:
$ sudo apt-get install ca-certificates-java
Create a separate folder to store our on ca certificate
Kubernetes management is abstracted via a rest API, which is served over a self signed secure connection. Frequently people run into issues when accessing this rest API because of TLS issues, in this case it can be useful to debug your connection with curl, as it will provide a detailed explanation of what is going wrong with your connection.
To have a grasp understanding on how authentication is taking place in kubernetes we will be creating a new service account with the required permission to perform our test with kubernetes.
Kubernetes is using a role based access system
Role Based Access – The Theory
Before we dive too deep, lets first understand the three pieces in a Kubernetes cluster that are needed to make role based access work. These are Subjects, Resources, and Verbs.
Subjects – Users or processes that need access to the Kubernetes API.
Resources – The k8s API objects that you’d grant access to
Verbs – List of actions that can be taken on a resource
These three items listed above are used in concert to grant permissions such that a user (Subject) is allowed access to take an action (verb) on an object (Resource).
Now we need to look at how we tie these three items together in Kubernetes. The first step will be to create a Role or a ClusterRole. Now both of these roles will be used to tie the Resources together with a Verb, the difference between them is that a Role is used at a namespace level whereas a ClusterRole is for the entire cluster.
Once you’ve created your Role or your Cluster Role, you’ve tied the Resource and Verb together and are only missing the Subject now. To tie the Subject to the Role, a RoleBinding or ClusterRoleBinding is needed. As you can guess the difference between a RoleBinding or a ClusterRoleBinding is whether or not its done at the namespace or for the entire Cluster, much like the Role/ClusterRole described above.
It should be noted that you can tie a ClusterRole with a RoleBinding that lives within a namespace. This enables administrators to use a common set of roles for the entire cluster and then bind them to a specific namespace for use.
Get the Bearer Token, Certificate and API Server URL
Get the token and certificate from the ServiceAccount’s token secret for use in your API requests. This script relies on the swiss army knife of JSON parsing on the command line, jq. Start by setting the SERVICE_ACCOUNTvariable.
$ SERVICE_ACCOUNT=my-service-account

#-- Get the ServiceAccount's token Secret's name
$ SECRET=$(kubectl get serviceaccount ${SERVICE_ACCOUNT} -o json | jq -Mr '.secrets[].name | select(contains("token"))')

#-- Extract the Bearer token from the Secret and decode
$ TOKEN=$(kubectl get secret ${SECRET} -o json | jq -Mr '.data.token' | base64 -d)

#-- Extract, decode and write the ca.crt to a temporary location
$ kubectl get secret ${SECRET} -o json | jq -Mr '.data["ca.crt"]' | base64 -d > /tmp/ca.crt

#-- Get the API Server location
$ APISERVER=https://$(kubectl -n default get endpoints kubernetes --no-headers | awk '{ print $2 }')
That’s it! You can now explore the API using your favourite tool without proxying the server or any other tricks. Remember to assign roles as needed to access various resources.
Most of the time when you install a linux system, and when not making usage of LVM, the default parition layout will consist of something like a large main partition, and an extended partition with a swap volume on it.
If you want to extend a disk of a linux virtual machine, you will have to reconfigure your disk on the hypervisor, and afterwards, re-arrange your partition lay-out on your linux virtual machine. This howto serves as a working procdure to resize your virtual disk in the right way.
First disable your swap space.
$ swapoff /dev/sda5
Comment out the swap partition out in /etc/fstab
Now edit your partition table, delete the swap partitions:
$ fdisk /dev/sda

#-- delete partition 5, then 2 and write changes
#-- shutdown the vm
#-- resize vm disk in hypervisor
#-- boot up the vm
Now edit your partition table to resize your main partition, and re-create the swap partition:
$ fdisk /dev/sda

#-- delete partition 1, and recreate it with new size leaving room for swap partition
#-- create extended partition 2
#-- create logical partition 5
#-- change type of logical partition to 82
#-- write changes
#-- reboot

$ mkswap /dev/sda5
$ blkid /dev/sda5

#-- enter uuid in /etc/fstab
#-- enter uuid in /etc/initramfs-tools/conf.d/resume

$ update-initramfs -u
$ reboot
$ resize2fs /dev/sda1
Sometimes Linux admins have the need to write startup scripts for which they require static network interface names. On systems where systemd is used this can be accomplished by below procedure.
To change the names of the network interfaces, we need to create a configuration file for each network interface.
After creating the configuration files, and modifying the interfaces file to bring up the correct interfaces, we need to make this change persistent by updating the initial ramdisk.
$ update-initramfs -u
The network interfaces will now be renamed the next reboot.
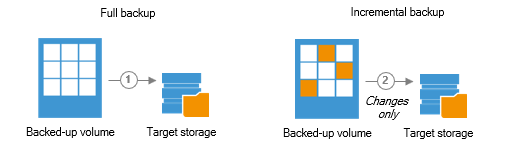
Changed Block Tracking speeds up incremental backup and replication. Due to technical limitations, CBT cannot be enabled in Free ESXi automatically.
ESXi 5.1 and earlier
CBT can be enabled manually by editing the VM settings. To enable CBT in a virtual machine on Free ESXi 5.1 and earlier, follow the steps below:
Power off the virtual machine.
Right-click the virtual machine and click Edit Settings.
Click the Options tab.
Click General under the Advanced section and then click Configuration Parameters. The Configuration Parameters dialog opens.
Click Add Row.
Add the “ctkEnabled” parameter and then set its value to “true”.
Click Add Row, add “scsi0:0.ctkEnabled”, and set its value to “true”. NOTE: The “scsi0:0” parameter in the “scsi0:0.ctkEnabled” value indicates the SCSI device assigned to the hard disk that is added to the virtual machine. Every hard disk added to the virtual machine is given a SCSI device that appears similar to scsi0:0, scsi0:1, or scsi 1:1.
Power on the virtual machine.
ESXi 5.5
CBT cannot be enabled without removing the VM from Inventory. To enable CBT in a virtual machine on Free ESXi 5.5, follow the steps below:
Power off the virtual machine.
Right-click the virtual machine and click Remove from Inventory.
Open Datastore Browser and browse the datastore where the virtual machine configuration file <VM name>.vmx is located.
Open the virtual machine folder on the datastore and download the <VM name>.vmx file.
Open the downloaded file using a text editor.
Manually add the ctkEnabled = “true” attribute.
Manually add the scsi0:0.ctkEnabled = “true” attribute. NOTE: The “scsi0:0” parameter in the “scsi0:0.ctkEnabled” value indicates the SCSI device assigned to the hard disk that is added to the virtual machine. Every hard disk added to the virtual machine is given a SCSI device that appears similar to scsi0:0, scsi0:1, or scsi 1:1.
Save the modified file.
Upload the modified <VM name>.vmx file back to the datastore.
Right-click the uploaded file and click Add to Inventory. The wizard for adding to inventory opens.
Follow the wizard and complete adding the virtual machine to Inventory.
Power on the virtual machine.
More information on Enabling CBT in VMware VMs can be found in VMware KB 1031873.
Integrating Open Source Operating Systems into a centralized Accounting and Authorization system Active Directory from Microsoft.
To facilitate this integration, we are making use of the System Security Services Daemon (SSSD) package, which provides us with access to local or remote identity and authentication resources through a common framework that can provide caching and offline support to the system.
It provides several interfaces, including NSS and PAM modules or a D-Bus interface.
Installation and configuration.
Check DNS resolving.
Verify if your OS can resolve the domain’s ldap SRV records:
$ dig -t SRV _ldap._tcp.mydomain.com
Verify if your OS can resolve the domain’s AD SRV records:
$ dig -t SRV _ldap._tcp.dc._msdcs.mydomain.com
NOTE: Verify if you can ping all displayed IPv4 and IPv6 addresses to check if there are no routing or firewall issues.
Check your hostname configuration.
Before you will be able to join the domain successfully without any error messages you need to verify your hosts file configuration. NOTE: the order in which you specify your hostnames is important, make sure that you FQDN of your computername is in the first position.
$ cat /etc/hosts
127.0.0.1       localhost
127.1.0.1       myhost.mydomain.com myhost
# The following lines are desirable for IPv6 capable hosts
::1     localhost ip6-localhost ip6-loopback
ff02::1 ip6-allnodes
ff02::2 ip6-allrouters
Configure your time service to syncronise with your domain controllers.
Stop your NTP server.
$ systemctl stop ntp
Edit your ntp.conf file.
$ vi /etc/ntp.conf
Modify the ntp.conf contents to reflect below configuration.
#-- replace below lines:
pool 0.debian.pool.ntp.org iburst
pool 1.debian.pool.ntp.org iburst
pool 2.debian.pool.ntp.org iburst
pool 3.debian.pool.ntp.org iburst

#-- replace with
server ntp.mydomain.com
Now save your config file.
Synchronize one time manually for initial time sync.
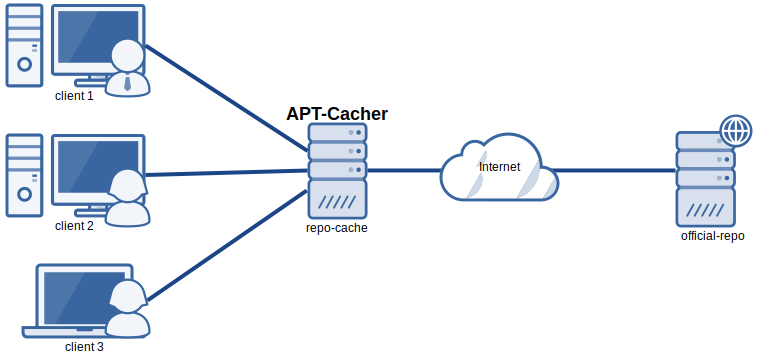
Suppose that you are on a network, a lot of Linux machines are installed, each with their own distribution version and set of packages. It happens frequently that packages are needed on the network. It’s a security risk to let old, unpatched operating systems connect to the internet. Therefore we can set up an apt-cacher server.
Server Installation:
NOTE: this caching server was implemented on a debian 9.3 Operating system.
Install apt-cacher and apache2 webserver:
$ apt-get install apt-cacher apache2
Enable apt-cacher:
Edit /etc/default/apt-cacher and change autostart to 1
Note: You may have problems doing this on a machine with apache already installed.
Restart apache:
$ sudo systemctl restart apache2
Server Configuration:
Edit /etc/apt-cacher/apt-cacher.conf and uncomment the following line:
# allowed_hosts = * Or set allowed_hosts to something appropriate.
Apt Cacher now uses IPv6 addressing so you may find you need something like: allowed_hosts=::ffff:192.168.0.1/24, for example, if you want to restrict hosts to a common home subnet.
Change the admin_email email address to something meaningful.
If you want to cache multiple distributions, uncomment the line and set distinct_namespaces value to 1:
distinct_namespaces = 1
By default apt-cacher may have problems with upgrades of ubuntu from one version to another when running do-release-upgrade -d
This can be fixed by uncommenting the line beginning with installer_files_regexp and modifying it from: